
vSphere 5 Best Practices: Dell PowerEdge R710 BIOS
Posted: November 9, 2011 Filed under: Dell, VMware | Tags: best practices, bios, bios settings, dell, memory, memory slots, power edge, poweredge, r710, slots, vsphere, vsphere 5 13 CommentsI’ve had occasion recently to implement many vSphere 4.1 environments for a customer. There’s a lot to learn during these deployments and many worthy blog posts are just waiting to be written. But one especially comes to mind mainly because of its temporal relation to a recent query I had regarding a BIOS setting for a Dell PowerEdge R710. The exact query doesn’t matter, but what’s important is that I ran across Marek.Z’s blog, Default Reasoning, and this post in search of an answer. His post regarding vSphere 4.x BIOS settings and best practices interested me in writing a BIOS best practices post for vSphere 5. This is going to be very similar to vSphere 4.x, but you’ll notice I’ve included explanations as to why these settings are best suited to vSphere 5 environments. Some of these settings may be obvious, while others, like NUMA, C1E, and Memory, may not be. Especially for these, I’ve included the results of my research.
My recent deployments have only dealt with Dell servers, specifically PowerEdge R710 servers with dual quad-core Intel Xeon L5520, 2.27 GHz CPUs and 96 GB RAM. The BIOS screen shots are from this server model.
Memory Settings
Within the Memory Settings, the Memory Operating Mode is set to Optimizer Mode by default. The only change, therefore, is to set Node Interleaving to Disabled, as it is enabled by default. Both of these settings warrant discussion. I’ll start with the Memory Operating Mode. My explanation comes from Dell’s memory white paper that can be found here.
Memory Operating Mode
The setting you’ll choose here will depend on the amount of RAM you have and your goals. See Dell’s white paper for details. The servers I have the most experience with have 12 DIMMs of 8 GB, 1066MHz. We have no need for memory mirroring (your OS won’t see half your installed RAM) or emulating a 128-bit data bus and Single Device Data Correction that Advanced ECC Mode gives us. Advanced ECC Mode would take extra precautions against corrupted data in memory and can fix some errors if detected. Our applications are standard Windows network services and don’t necessarily need this extra protection from memory corruption or errors. Our choice here, then, is Memory Optimizer (or Optimized) Mode, the function of which is explained in Dell’s white paper and shown below.


When set to Optimizer Mode, your DIMMS need to be populated in a certain arrangement. From the Dell white paper, this is how the R710 memory slots are numbered with respect to the CPUs.

Optimizer Mode is most efficient with DIMMs installed evenly in each of the channels. My installation looks like this.
A1: 8 GB, 1066 MHz
A4: 8 GB, 1066 MHz
A7: <empty>
A2: 8 GB, 1066 MHz
A5: 8 GB, 1066 MHz
A8: <empty>
A3: 8 GB, 1066 MHz
A6: 8 GB, 1066 MHz
A9: <empty>
B9: <empty>
B6: 8 GB, 1066 MHz
B3: 8 GB, 1066 MHz
B8: <empty>
B5: 8 GB, 1066 MHz
B2: 8 GB, 1066 MHz
B7: <empty>
B4: 8 GB, 1066 MHz
B1: 8 GB, 1066 MHz
Here’s an example of DIMMs installed to take advantage of Memory Optimizer Mode. Note also that we are choosing a balanced performance configuration as described in Dell’s white paper, an excerpt of which is below:


The options you have for configuring RAM in R710s will depend on your goals and your available hardware. Depending on the number of DIMMs you have and your goals, you can choose from the following configurations. I’ve highlighted what you can do in Memory Optimizer Mode with 12 DIMMs of 8 GB and 1066 MHz. I’ve installed two DIMMs per channel (DPC) and used all three channels

NUMA
Generally, if your hardware supports Non-Uniform Memory Access (NUMA), you should enable it. By default, the R710 disables NUMA which is represented by the Node Interleaving feature set to enabled. As shown in the BIOS screen shot above, Node Interleaving should be disabled in order to enable NUMA.
NUMA is a newer computer architecture that recognizes memory access times are much different for memory physically located nearer or farther away from a particular CPU. NUMA capable hardware creates CPU and memory nodes, called NUMA nodes, which have “local” and “remote” memory for each core of a CPU. One particular CPU will have some amount of local RAM assigned to it. This local memory will have lower access times from that CPU than memory not local, or remote, to that CPU. NUMA aware operating systems can then schedule processes to run on CPUs that are physically closer to the data needed by that process, for instance that data stored in local memory. Applications can also be NUMA aware, like Microsoft SQL Server 2008.
ESXi 5 is NUMA aware and can intelligently run processes on CPUs closer to their data. ESXi 5 handles this scheduling transparently so the VMware administrator does not have to worry about balancing virtual machine workloads manually. The caveat here is that, obviously, your hardware must support NUMA and you must enable this feature in the BIOS.
Processor Settings
Virtualization Technology
The important processor setting that may not be enabled by default in an R710 box is Virtualization Technology. Virtualization Technology enables hardware-assisted virtualization which basically implements virtualization related tasks in hardware (which is much faster) which have historically been implemented in software (which is much slower).
Execute Disable
The Execute Disable feature will keep executable instructions and data separated in memory. This helps prevent some types of buffer overflow attacks. ESXi may holler about this feature being disabled, especially during vMotions, so be sure enable it.
Turbo Mode
Turbo mode will let your CPU automatically over clock itself if it meets certain electrical characteristics at a certain time, such as voltage, current, power, etc. This is usually enabled by default.
C1E
The C1E feature is explained well in the Performance Best Practices for VMware vSphere 5.0 PDF, available here. C1E is the Enhanced C1 processor state included in the Advanced Configuration and Power Interface (ACPI) standard. It allows the CPU to enter a halted state, lowering power consumption, when not executing instructions. It can resume execution essentially instantaneously, so the downside of enabling C1E is non-existent. This is power savings at no cost to performance. The PDF mentioned above also states that certain single-threaded workloads can see an increase in performance if both C1E and Turbo Boost are enabled.

Boot Settings
There’s no particular setting to change here, but I wanted to point out that by default, the R710 is able to PXE boot from Gb NIC 1. Unless you have cause for PXE booting your server, disable PXE booting. You don’t disable PXE from this menu, but this is where you’ll see if your server is configured to PXE boot. Once you disable PXE booting, you can return here to verify your settings.

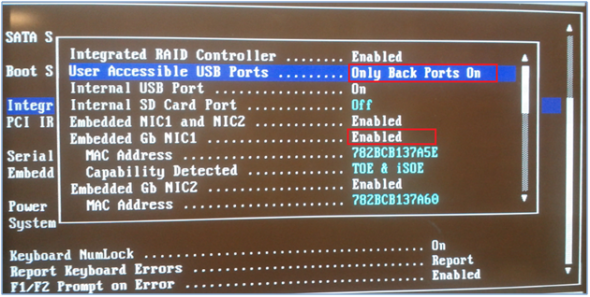
Integrated Devices
For a little bit more security, I like disabling the front USB ports. The rear ports in many cases need to be left enabled, for example, for a USB KVM. The Integrated Devices menu is also where you can disable PXE booting. By default on the R710, PXE booting is enabled on Embedded Gb NIC 1. It will read something like, Enabled with PXE. Go ahead and change this setting to Enabled only.
Serial Communication
If you don’t plan on using your server’s serial connection, go ahead and disable it in the Serial Communication menu. Along the same lines, if you’re not using a serial console redirector, disable the Redirection After Boot option, as well, even though the screen shot below does not show it.

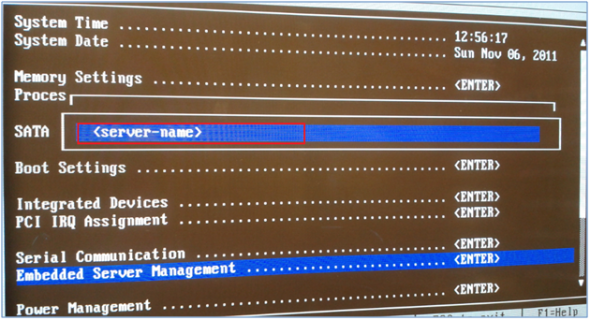
Embedded Server Management
The R710 (among other models) includes a useful LCD on the front. You can display the server’s hostname, IP address, MAC address, service tag, it includes hardware errors and warnings…basically, it’s a neat little feature of Dell boxes. I like to include the server hostname in the Embedded Server Management menu. Once you click on it, be sure to keep the setting, User-Defined String. After saving your changes and rebooting, you should see your hostname on the front LCD. If you have many servers or new employees, it’s useful to have the name displayed prominently on the LCD instead of using labels.
Power Management
This is the last important setting you’ll want to change in your Dell box. ESXi 5.0 (and 4.x) has the ability to work with the BIOS to control power management. If Power Management is set to OS Control in the BIOS, you can change the power settings in the vSphere Client to your liking, high performance, balanced, low power, etc. If, when trying to configure power settings in the vSphere Client, you see something like, Not Supported, either your hardware does not support this feature or OS Control is not set in the BIOS.
Conclusion
I hope you find these settings, screen shots, and links useful. Please feel free to leave comments on what works for you, what doesn’t, or anything in between.
All the best,
VirtuallyMikeB


Hi there,
Thanks for the post. Very useful and informative.
Daern
This was very informative, however, my R710s already had the memory/cpu options set. Perhaps if you buy the server with ESXi Embedded, Dell goes ahead and optimizes the BIOS settings for a VMware environment. Regardless, I learned something new about these servers. 🙂
Had to find where the heck I disabled the USB ports… Learned about the C1 – That’s something new to me 🙂
Rolling out 15 r610s with xen, but same tech behind scenes… all applies! Chris
I like this, very helpful, thank you very much for wirting about it, I will definitely use it this way.I imagine that one must still create access groups etc. for people’s permissions to do one thing or another, e.g. start/stop VMs but not add virtual hardware or not have access to all the VMs e.g. access only to Windows guests not to Linux guests correct??Thank you, Tom
Hi Mike,
I have some Dell R710’s E5640 2.76GHz and have a problem with EVC enablement in a HA cluster! It will not accept any of the listed EVC modes. Are some of your described settings here a cure for this problem?
Regards
Bob
Hi Bob,
Thanks for reading. The Execute Disable setting must be enabled for an EVC cluster to ensure vMotions can occur without problems – just the function for which EVC was created. Check out this VMware KB to be sure your processors are compatible.
http://kb.vmware.com/selfservice/microsites/search.do?language=en_US&cmd=displayKC&externalId=1003212
Cheers,
Mike
One should stress that “OS Demand-Based Power Managemt” is not a nice-to-have, but essential. If you don’t set it, you will end up seeing extremely hight %LAT_Cs in your environment.
Thanks for the post on this. We are in the middle of this exact deployment on this exact hardware at our institution and this was very helpful. Question for anyone out there that might know… It looks like the BIOS OS Watchdog timer is the hardware based monitor and then vCenter uses its own Watchdog timer which is software based. What is the general recommendation on how to set these? should they both be set to the same value? Should only one be set?
good thanks for sharing
is 96GB the maximum amount of memory? can we do 16GB per slot? or fill up the empty slots.
Hi Mike but is good to enable the C1E feature? Im readimg several websites where vmware sugguest to disable it.
Thanks!
@Erick Dell say:
C1E: VMware recommends disabling the C1E halt state for multi-threaded, I/O latency sensitive workloads. This option is Enabled by default, and may be set to Disabled under the “Processor Settings” screen of the Dell BIOS.
http://en.community.dell.com/techcenter/virtualization/w/wiki/3033.dell-vmware-vsphere-performance-best-practices
@Erick – Dell says this:
C1E: VMware recommends disabling the C1E halt state for multi-threaded, I/O latency sensitive workloads. This option is Enabled by default, and may be set to Disabled under the “Processor Settings” screen of the Dell BIOS.
http://en.community.dell.com/techcenter/virtualization/w/wiki/3033.dell-vmware-vsphere-performance-best-practices