Fun with Vyatta and home routing!
Posted: January 8, 2013 Filed under: Networking, VMware | Tags: intervlan routing in vmware workstation, nat with vyatta, realtek diagnostics, realtek diagnostics utility, virtual router, vlans and workstation, vyatta, vyatta community edition 20 Comments24 October 2014 Edit: fixed typos when setting IP addresses and descriptions on Vyatta interfaces (from eth0 to the proper interfaces)
Good day my Internet friends! Let me say that I feel accomplished – and not just because I got out of bed this morning, although that is a big win for me. No, instead I’ve actually been quite productive (based on my standards, anyways). I’ve been rebuilding my home test lab for the past couple of days before I start my new job. What I really wanted was to get back heavy into the NetApp DataONTAP simulator, but I wanted to get inter-VLAN routing working first so I could have some realistic networking. I only have layer 2 switches in the lab so I was looking for ways to accomplish this. I reckon I knew I would have to use software of some sort, but I hadn’t actually messed with anything up to this point. I’d heard of the Vyatta virtual router recently, so I thought I’d give that a try. ![]() You can download the free community edition here with a login: http://www.vyatta.org/downloads I wasn’t able to find the Vyatta virtual appliance I saw advertised around the interwebs, but I was able to install from the LiveCD ISO just fine.
You can download the free community edition here with a login: http://www.vyatta.org/downloads I wasn’t able to find the Vyatta virtual appliance I saw advertised around the interwebs, but I was able to install from the LiveCD ISO just fine.
Before I get too far, let me explain why I’m even writing this post. There has been a lot written and blogged about with regard to the Vyatta virtual router. There are many configuration examples and the vendor documentation is quite good. But I came across a few things that seemed unique to my environment or at least that hadn’t been blogged about yet (or if it had, I couldn’t find it and had to *sniff* go it alone).
After working on these issues for about two days straight, let me list these highlights of what I learned the past couple days:
<> Adding multiple network adapters to the Vyatta virtual router
<> Working with the Vyatta virtual router within VMware Workstation
<> Configuring inter-VLAN routing between a physical infrastructure, a laptop, and VMware Workstation
<> Connecting the Vyatta virtual router to a retail wireless router for access to the Internet (*hint – it’s called double-NAT!!)
Overview
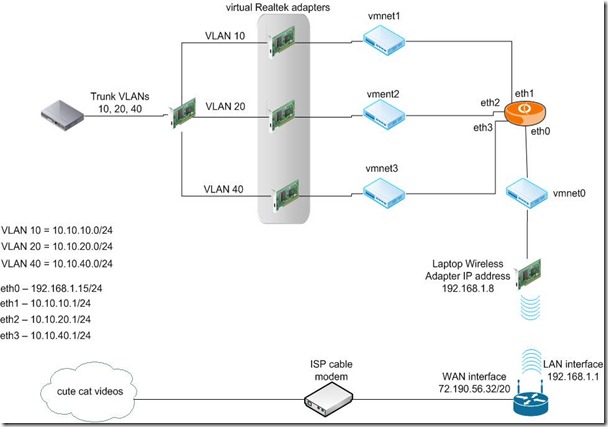
Let me share with you the final configuration with this diagram. What interesting parts are within the VMware Workstation installation on the laptop and of course, the Vyatta configuration itself. For a more complete picture of what I’m trying to accomplish, I’ve included the physical ESXi hosts on the far left. The connections leaving the ESXi hosts are 802.1Q trunked with management traffic in VLAN 10, VM traffic in VLAN 20, and storage traffic in VLAN 40. The storage traffic is only trunked out these interfaces for management purposes because my Iomega ix-2’s only have one interface each which must be used for both storage and management traffic. The backend storage network is not shown in this diagram. A trunked link also leaves the 2960 switch and terminates at a 1 Gbps NIC on my administration host, an HP laptop. This laptop is running Workstation 8.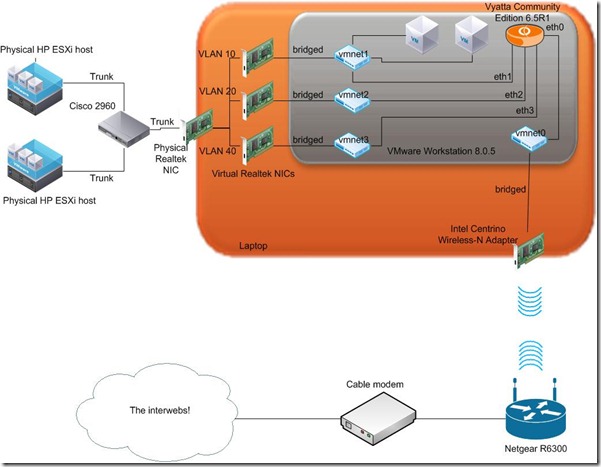 Along with the physical NIC, the laptop has an 802.11n wireless adapter. This connects to a Netgear R6300 retail wireless router. The Netgear, then, connects to an ISP-provided cable modem and out the internets.
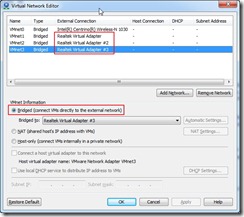
As a note, here is the final Virtual Network Editor configuration inside Workstation. Each vmnet is bridged to either a virtual Realtek adapter (detailed below) or the wireless adapter.
Notes before we get started
Be sure to save your Vyatta configuration often by committing it to NVRAM with the commit command.
# commit
While trying to figure out how to use VLANs with my lab setup, I came across a forum thread that 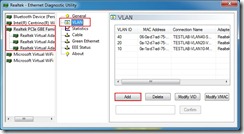 mentioned using the Realtek Diagnostics Utility to configure VLANs. You can find it here: http://bit.ly/dmUWE2 and look for the Windows Diagnostic Program. This utility is pretty cool. It reminds me of VM-FEX (I know they’re different, though) in that it creates multiple virtual adapters from a single hardware device. This may be one of the few ways to use VLANs on a machine with a single physical NIC port.
Vyatta virtual router installation
I downloaded the 6.5R1 ISO. One simple installation note I missed (because I didn’t RTFM) was, well, how to install it. Simply run the following after you boot from the LiveCD. Login is vyatta/vyatta.
~$ install image
Follow the prompts and you’ll be up and running in about a minute. The hardware requirements are essentially minimal: 256MB RAM and perhaps a GB of disk space. I don’t always like small, but when I do, it’s probably in a test lab 🙂
One thing to note was that it was useful to add one vNIC at a time to the Vyatta VM. This way, as I 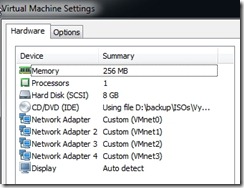 add a vNIC, it gets labeled in VMware Workstation sequentially, as in: Network Adapter, Network Adapter 2, Network Adapter 3, etc., and Vyatta then installs them sequentially as eth0, eth1, eth2, etc. I made the mistake of adding four network adapters at one time and then booting the appliance. I assigned IPs and configured the router as I wanted, then was troubleshooting for hours until I realized that Vyatta had simply assigned the adapters as it found them at boot time which was not necessarily the order in which they were installed or labeled in the VM itself. So, save yourself some headaches and add one vNIC at a time with reboots in between.
Vyatta configuration
Here’s my minimal configuration of the Vyatta virtual router. I’ll point out the bits that took me a while to figure out and were crucial to getting this working. The full Vyatta config can be seen at the bottom of this post from the output of the show config command.
Once you’re installed and ready to go, log in with your new credentials. Before you get too far into the config, once you get an address configured you can reach from your laptop, you can configure SSH and complete the rest of the config from a PuTTY session. Configure SSH like this:
~$ configure# set service ssh
# set interfaces ethernet eth1 description 10-NETWORK
# set interfaces ethernet eth0 address 10.10.10.1/24
From here, you can SSH to your management interface. Set up the rest of your interfaces.
~$ configure
# set interfaces ethernet eth0 description OUTSIDE
# set interfaces ethernet eth0 address 192.168.1.15/24
# set interfaces ethernet eth2 description 20-NETWORK
# set interfaces ethernet eth2 address 10.10.20.1/24
# set interfaces ethernet eth4 description 40-NETWORK
# set interfaces ethernet eth4 address 10.10.40.1/24
Configure your domain name and DNS servers.
# set system domain-name testlab.local
# set system name-server 10.10.10.10
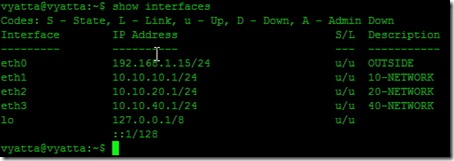
So with this configuration, let’s take a closer look at how our networking is configured.
So from here, what we need in order to route traffic from VLANs 10, 20, and 40 to the Internet, we need to configure two things on the Vyatta router: a default gateway and NAT.
At first, I tried using a static route for 0.0.0.0/0 to the LAN interface of the Netgear wireless router, 192.168.1.1, thinking once the Netgear received the request it would forward it on just like any other address. This didn’t seem to work as I would have guessed. Instead, I configured a default gateway by executing
# set system gateway-address 192.168.1.1
I guess I should have whiteboarded it beforehand and saved myself some time. Going back to my CCNA days, I realized a default gateway or static route alone won’t work because once traffic is routed across the Vyatta, the source IP addresses are still 10.10.x.x. Even if the Netgear forwarded the packets, the source IP isn’t known by the cable modem (and therefore wouldn’t be NAT’ed) and certainly won’t be routed out into the fuzzy-kitten-video-verse. This was the last thing I realized and the final piece to the puzzle. I needed to configure NAT at the Vyatta so the Netgear could then use its own default NAT scheme.
Configuring NAT
Configuring NAT is pretty easy. There are several types of NAT, of course, so choosing the appropriate one is important. In my case, I wanted to dynamically NAT three inside source subnets to a single outside IP address, the eth0 IP address. This configuration is called Source NAT (many-to-one). From the Vyatta NAT documentation, here’s generic diagram of what we’re going to configure.
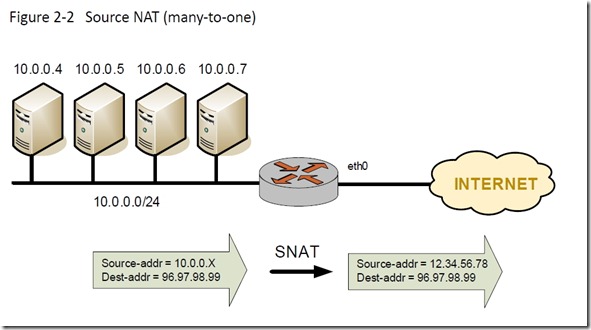 My configuration steps follow. These four commands are repeated for each inside subnet. NAT rule 10 corresponds to VLAN 10, rule 20 to VLAN 20, and rule 40 to VLAN 40.
# set nat source rule 10
# set nat source rule 10 source address 10.10.10.0/24
# set nat source rule 10 outbound-interface eth0
# set nat source rule 10 translation address 192.168.1.15
An alternative to specifying a translation address is to use the masquerade keyword.
# set nat source rule 10 translation address masquerade
This will replace outgoing packets with the primary IP address of the outbound interface. In my case, I could have also used masquerade because eth0 only had a single IP address assigned.
After committing your NAT config, you can run 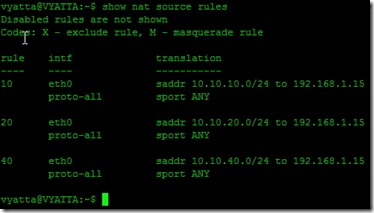
~$ show nat source rules
And that’s it. Test connectivity to the Internet. VMs running in both Workstation and the physical ESXi hosts will have Internet connectivity. This was a big win for me because I spent so much time on it. You can be assured there was much fist-pumping, back-slapping, and high-fiving of one’s self after figuring this out.
Full Vyatta configuration
vyatta@VYATTA:~$ show config
interfaces {
ethernet eth0 {
address 192.168.1.15/24
description OUTSIDE
duplex auto
hw-id 00:0c:29:e5:7c:ee
smp_affinity auto
speed auto
}
ethernet eth1 {
address 10.10.10.1/24
description 10-NETWORK
duplex auto
hw-id 00:0c:29:e5:7c:f8
smp_affinity auto
speed auto
}
ethernet eth2 {
address 10.10.20.1/24
description 20-NETWORK
duplex auto
hw-id 00:0c:29:e5:7c:02
smp_affinity auto
speed auto
}
ethernet eth3 {
address 10.10.40.1/24
description 40-NETWORK
duplex auto
hw-id 00:0c:29:e5:7c:0c
smp_affinity auto
speed auto
}
loopback lo {
}
}
nat {
source {
rule 10 {
outbound-interface eth0
source {
address 10.10.10.0/24
}
translation {
address 192.168.1.15
}
}
rule 20 {
outbound-interface eth0
source {
address 10.10.20.0/24
}
translation {
address 192.168.1.15
}
}
rule 40 {
outbound-interface eth0
source {
address 10.10.40.0/24
}
translation {
address 192.168.1.15
}
}
}
}
protocols {
rip {
redistribute {
}
}
static {
}
}
service {
ssh {
port 22
}
}
system {
config-management {
commit-revisions 20
}
console {
device ttyS0 {
speed 9600
}
}
domain-name testlab.local
gateway-address 192.168.1.1
host-name Vyatta
login {
user vyatta {
authentication {
encrypted-password ****************
}
level admin
}
}
name-server 10.10.10.10
ntp {
server 0.vyatta.pool.ntp.org {
}
server 1.vyatta.pool.ntp.org {
}
server 2.vyatta.pool.ntp.org {
}
}
package {
auto-sync 1
repository community {
components main
distribution stable
password ****************
url http://packages.vyatta.com/vyatta
username “”
}
}
syslog {
global {
facility all {
level notice
}
facility protocols {
level debug
}
}
}
time-zone GMT
}
vyatta@VYATTA:~$



If you ever need a second job, you should look into writing tecnical manuals.
Thanks for the kind words, but I doubt I’d enjoy writing about such boring things.
Can you 192.168.1.x ip addresses ping any of your 10.x.x.x addresses, including the 10.x.x.x. addresses on vyatta itself? Bascially, can devices coming through your wireless network ping the 10.x.x.x addresses?
Yes, everything could ping everything else in the lab. The one exception is that I didn’t configure any port forwarding on my firewall so I couldn’t manage anything from the outside. But inside, everything in all networks could communicate. The Vyatta, as you know, was providing the routing between networks. From your Vyatta, can you ping devices on each network?
I’m having an issue I posted here on the vyatta forums:
http://www.vyatta.org/node/101259
All my devices that are vm instances (172.16.x.x devices) can ping my 192.168.41.x. router and reach the internet. No nat is involved becase my router is doing that. My switch (192.168.41.x) and my router (192.168.41.1) cannot ping inbound to the 172.16..x.x vm instances or even the 172.16.x.x vyatta addresses. They can reach the vyatta 192.168.41.x vyatta address of course. I used tcpdump as well to look for packets coming inbound on eth3 but no luck.
My conifig is slightly different than yours. I also enabled routing for a bit on my Win7 laptop so I could a route pointing to the 172.16.x.x networks via the vyatta 192.168.41.x interface. If it works outboud though, the routing should be in place. This is driving me nuts..:)
I bet you need to add static routes to anything that needs to reach behind your Vyatta. Everything in your 192.168.41.0 network will likely have it’s default gateway or default route configured to be 192.168.41.1, your Internet router. When you ping something behind your Vyatta, the device you’re pinging from doesn’t know about the network you’re pinging. As you know, if a device doesn’t know how to reach a certain network, it sends it to it’s default gateway or default route. If you want devices to hit the Vyatta from the 192.168.41.0 network, you need to either add static routes to every device that lives in your 192.168.41.0 network or possibly add static routes on your Internet router to point back to your Vyatta for every network that sits behind the Vyatta. Does that make sense?
Yea, I do understand and I have done all that already. Don’t forget the 172.16.x.x. devices can reach the internet so the router/devices know the path back. It’s just going outbound only. I will recheck EVERYTHING today. Just weird stuff.
Do you have RIP configured on the Vyatta and your Internet router? Any routing protocol would do.
You’re gonna laugh. Windows firewall was enabled on the Home/Work network which is odd because I always have it disabled! I’m real good with routers and switches but dangerous on Windows..:)
haha 😀 nice advice almost forgot about firewall at Windows
Hi,
That was really nice piece of work to explain NATing, but one thing i didnt understand is that you are using the word “VLAN” just because you are configuring LANs in VM-Ware (or some virtual environment)? Because in case of a vyatta, you need to define a virtual interface using
#set interfaces ethernet eth0 vif 10 address 10.10.10.1/24
which sends/receives 802.1Q tagged packets. An in that case how would we configure an interface in vyatta to be used as trunk? And use that trunk to carry tagged information packets of all three VLANs to other end (in your case the Cisco 2960)?
Hey Arshan,
Thanks for your comment. Excellent timing, my friend. This post is 1 year old today! I remember the late nights that went into figuring this out with fondness…I wrote this with the intention of getting back up to speed with NetApp for my new gig. Turns out my new gig has panned out really well. I’ve done a few NetApp deployments, along with Cisco UCS and VMware’s SRM.
So I’m tracking with you on what appears to be a mistake in language. The configuration above does, indeed, use VLANs. The ESXi hosts were using tagged port groups (not shown in this post). But with your question, I looked at this config a bit closer. The way I configured the Vyatta, it does not use VLANs. But I don’t know where the VLAN tags are being stripped off: at the Realtek Virtual Interfaces or at the Vyatta interfaces. If the Vyatta receives a 802.1q tagged packet on an interface that is not configured for a VLAN, will it simply strip it off, ignore the tag, and route the packet accordingly or will it drop the packet? I don’t know and for now, I’m not going to test. Do the Realtek Virtual Interfaces strip tags? I don’t know. Wireshark could tell you though.
But, here’s something I really do like and I don’t know how I missed this the first time. You’re right about adding 802.1q VLAN tagging to the Vyatta. You use the following format:
#set interfaces ethernet eth0 vif 10 address 10.10.10.1/24
And then to make that interface a VLAN trunking interface, add another vif. Do something like this:
#set interfaces ethernet eth0 vif 10 address 10.10.10.1/24
#set interfaces ethernet eth0 vif 20 address 10.10.20.1/24
And voila! You have a single VLAN trunk on your Vyatta. No need to add multiple network adapters to create separate networks.
Thanks again for your comment and bringing back a goodie!
All the best,
Mike
The configuration you have shown is not correct. I haven’t seen intervlan routing in between as you have not used vif command to configure Vlans
Hello,
Thanks for the comment. As mentioned in the comments above, you’re right – I’m not using VLANs on the Vyatta, but on the ESXi host portgroups (not shown).
– Mike
Hello,
can you make clear one thing. you said you are using only a laptop with VM workstation on it. where did u install vyatta (on a VM or Hard disk or USB…) and how to run the vyatta router while using VMware at the same time?
thank you
Elie
Hello,
I installed the Vyatta virtual router inside VMware Workstation. I created a VM based on Vyatta’s recommendations first, then mounted the ISO image and installed the software on the VM.
I’m sorry, but I’m not clear on your question of how to run the Vyatta and VMware Workstation at the same time. They’re not mutually exclusive. In fact, the Vyatta virtual appliance, by its very nature, depends on VMware Workstation (or some other hypervisor) to run at all.
All the best,
Mike
Hello Mike,
yes that’s what i meant. i got a little bit confused because i’m new to vyatta. i thought it has to be installed on the laptop itself.
you did a great job over here. i’m preparing a test lab and i’m gona establish your setup.
thank you very much
Elie
Thanks for the kind words. Be sure to read the comment section of this post because other kind strangers have shared corrections to the post.
I hear that Vyatta open source has been retired by Brocade,Will this work with Vyos ?
Hi Mike
Before all I sincerely thank you for this EXCELLENT howtoo. It is very clear and thanks to it, I have been able to configure a small virtual lab, just more simple.
This is my lab:
1) Vmware workstation running on dell server with a public IP (direct access to internet)
2) Vyos running on vmware workstation with 2 network adapters:
-network adapter (NAT) — it correspond to vmnet8 NAT and provide internet connectivity as you did with Intel Centrino Wireless adapter
-Network Adapter2 Custom (VMnet10) — an additional “host-only” virtual network (10.10.10.0)
3) A windows windows 2012 server (hostname: w2012tst1) running on vmware workstation with vmnet10 adapter
4) Esxi 6 nested host (inside vmwware workstation) with several virtual adapter (vmnet 10 for management, vmnet11 nfs etc..)
My goal was to configure vyos as router between networks. The flow is:
vyos——–(eth0,dhcp IP: 192.168.248.135)——–NAT to public IP (vmnet8)
vyos——–(eth1,10.10.10.50)——–MANAGEMENT NETWORK (vmnet10)
w2012tst1——–(10.10.10.60,gateway 10.10.10.50)——–vyos
To accomplish that, I executed these are commands I executed within vyos:
set service ssh port 22
set int ethernet eth0 address dhcp
set int ethernet eth0 description OUTSIDE
set int ethernet eth1 address 10.10.10.50/24
set int ethernet eth1 description MANAGEMENT
set nat source rule 10 outbound-interface eth0
set nat source rule 10 source address 10.10.10.0/24
set nat source rule 10 translation address masquerade
commit
save
As you can see the vyos router automatically get IP from vmnet8 and provide NAT for the management network 10.10.10.0
On machine w2012tst1 I assigned ip address 10.10.10.60 with default gateway 10.10.10.50 and it worked perfectly!
So…what is the question/problem?
Reading your reply to Arshan about VLAN, I assigend just one network adapter (vmnet8) to the vyos and changed the configuration in this way:
set service ssh port 22
set int ethernet eth0 address dhcp
set int ethernet eth0 description OUTSIDE
set interfaces ethernet eth0 vif 10 description ‘VLAN 10 MANAGEMENT’
set interfaces ethernet eth0 vif 10 address ‘10.10.10.50/24’
set nat source rule 10 description VLan10toOUTSIDE
set nat source rule 10 outbound-interface eth0
set nat source rule 10 source address 10.10.10.0/24
set nat source rule 10 translation address masquerade
At this poin I’m stucked because I don’t understand how to change network configuration on w2012tst1 to make this work. What vmnet should I assign to w2012tst1 (instead of vmnet10)? What default gateway? Should I configure vlan tagging within os???
To be honest with you I never played with VLANs thus I suspect that some big piece is missing in my understanding.
I really appreciate your help
Best
Marco